If you’re a backend developer, you know the pain of going through extensive API docs and finding out that exact endpoint or method you’ve been looking for the past couple of hours. But this is the era of AI, so why not leverage that right?
This is where Swytchcode comes in, it solves this exact problem! And we’ve found a really interesting solution to this which doesn’t even require you to leave your IDE.
Let’s find out?
The Hidden Cost of API Integrations
First lets talk about what the exact problem is and why we built this amazing tool.
As developers, we’ve all been there - staring at endless pages of documentation, piecing together code snippets, and wasting valuable time on what should be straightforward integrations.
The worst part? This same painful process repeats with every new API we need to connect to our applications.
A typical API integration requires:
- Understanding authentication mechanisms
- Figuring out the right endpoints for your use case
- Handling responses and error cases properly
- Implementing proper security measures (protecting API keys, preventing CSRF/XSS attacks)
- Writing clean code with proper types
- Testing everything works as expected
All of this takes precious time away from building your actual product features.
The Solution? SwytchCode!
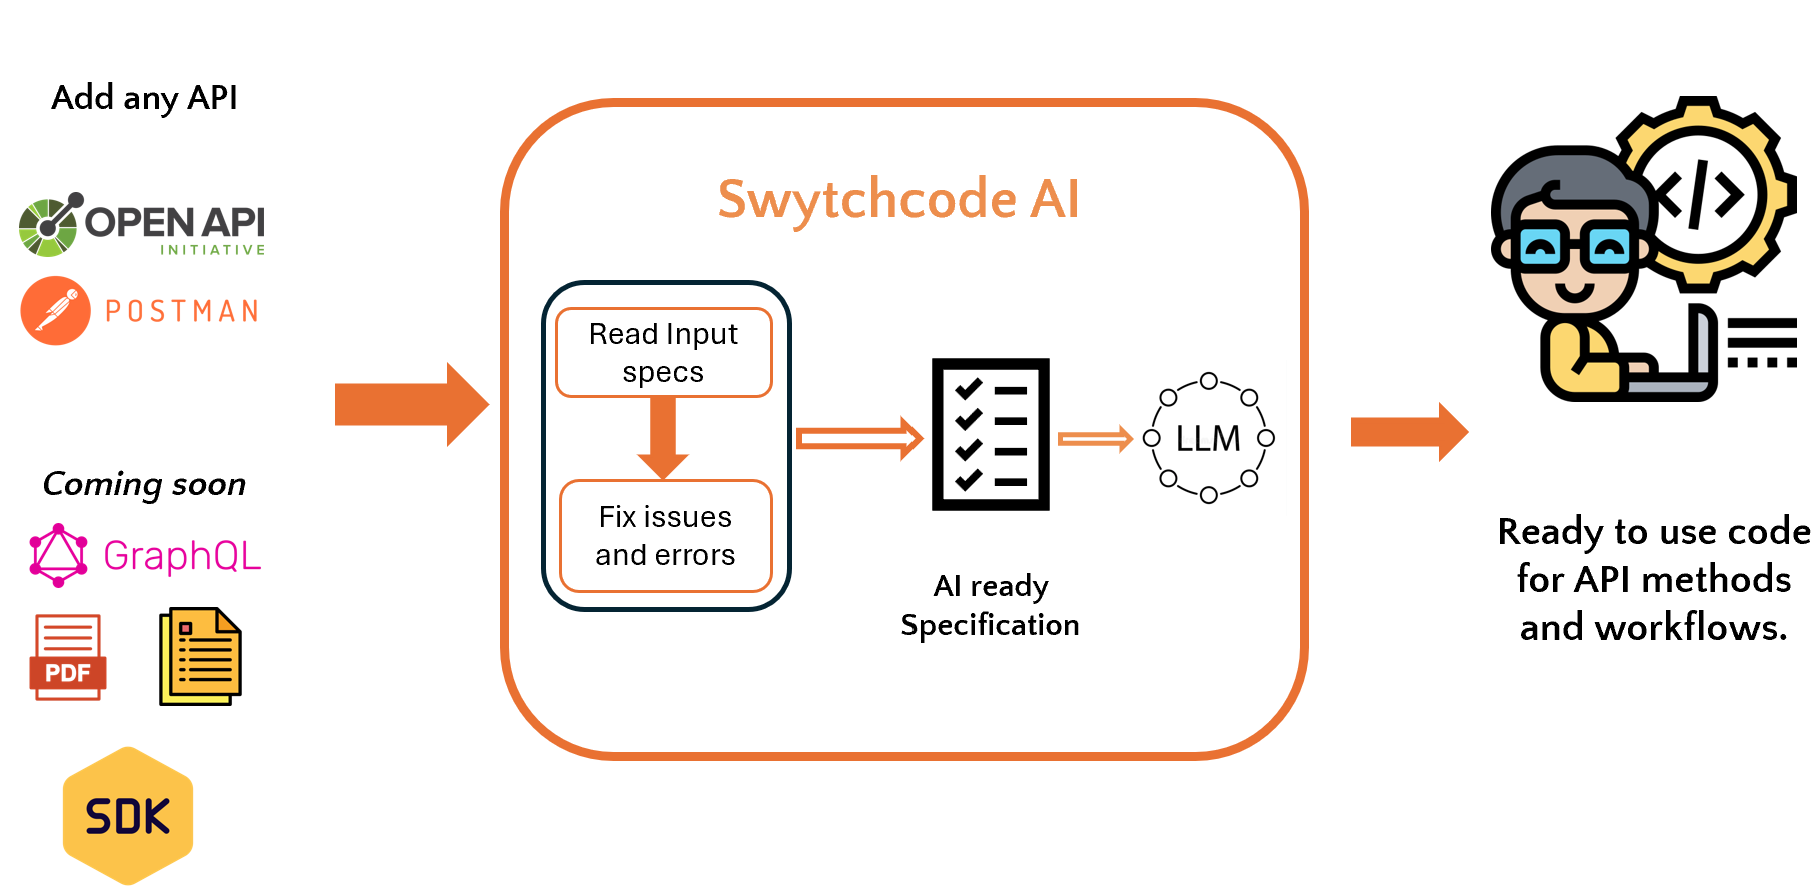
SwytchCode is an AI-powered tool that generates ready-to-use, production-grade code for API integrations.
It directly works in your IDE, that’s the insane part! Just install the extension, a few clicks and done! You will have your endpoint up and ready to go written with respect to the latest documentation!
Here’s how it works with a library:
This saves both time and costs compared to using other LLMs for the same task. Also, unlike unified API provider platforms, the generated code is fully owned and customizable by you.
Getting Started with SwytchCode
Installing the VS Code Extension
- Open VS Code
- Go to Extensions (Ctrl+Shift+X)
- Search for “SwytchCode”
- Click Install
Using the Web Dashboard
- Visit app.swytchcode.com
- Log in with your SwytchCode account
- Explore the Organizations, Services, and Workflows tabs
- Create your first custom workflow by clicking “New Workflow”
What makes SwytchCode so unique?
Multi-API Support
We aren’t just limited to one type of API - we span across multiple industries and use cases. SwytchCode offers integration capabilities with a diverse ecosystem of APIs which you can check out here.
Popular APIs to integrate with SwytchCode

We are continuously adding support for the most requested APIs.
Need support for an API not listed? SwytchCode can generate code for virtually any API with proper documentation, and we’re constantly adding official support for new integrations based on user requests.
Instant Code Generation
No more piecing together code from documentation. SwytchCode gives you complete, working integration code instantly, including:
- Proper authorization flows
- Request and response handling
- Error management
- Type definitions
Here’s how you can generate a stripe integration code in typescript instantly with Swytchcode:
Multi-Language Support: Code in Your Preferred Language
SwytchCode breaks down language barriers by generating code in 15 different programming languages. Whether you’re working in a TypeScript project today and a Python project tomorrow, SwytchCode adapts to your needs.
All generated code follows language-specific best practices and conventions, so it feels like it was written by an expert in that language.
Workflow Generation: Orchestrating Complex Integrations
But we rarely use a single API call in isolation. We need to handle multiple calls, use-cases, integrations together.
So we have a feature SwytchCode generates code for entire workflows spanning multiple API endpoints and even different services.
These workflows can be customized and saved for your personal account in the Swytchcode dashboard which we’ll talk about in a bit.
Here’s a quick demo of how you can create custom workflows:
The SwytchCode VS Code Extension
The extension was built so all of this could directly be integrated into your IDE so you wouldn’t have to ever leave your development workflow for anything!
With the extension, you can:
- Access API methods and workflows directly from your editor
- Get code in your preferred language with a single click
- View your call history to reuse previous integrations
- Track usage statistics
You can access the extension here.
Using the Extension
Here’s a quick demo of how you can use SwytchCode directly from your IDE:
The SwytchCode Web Dashboard
For API management and more advanced configuration, we provide a comprehensive web dashboard at app.swytchcode.com.

It’s where you can organize your work, especially if you’re part of a team.
You can set up different organizations, invite colleagues, manage their access levels, and see on how SwytchCode is being used across your team.
Perhaps one of the most powerful aspects is building custom methods and workflows. If you have common sequences of API calls specific to your business needs, you can define them as reusable methods or bundle them into workflows here. Once created, you and your team can easily reuse these custom integrations.
The SwytchCode Copilot Agent
You can use our Copilot Agent to experience SwytchCode in an integrated chat. The agent is available on all platforms supported by Copilot, including Visual Studio Code, Visual Studio, GitHub, JetBrains, and more.
Requirements
Before you begin, make sure you have:
- GitHub Copilot installed and configured in your preferred IDE/platform
- A SwytchCode account for access to the agent
Installation
To use Copilot agent, you need to have a Github account:
- Visit https://github.com/apps/swytchcode to install the Swytchcode Copilot agent
- Accept the permissions required by the agent
- Once installed, you can access the Swytchcode agent in any Copilot interface. You will also receive an email to reset your password—please update it to ensure seamless access to other interfaces.
Using the Copilot Agent
Once everything is set up, you can use the SwytchCode agent in your Copilot-enabled environments:
- Open Copilot Chat in your supported IDE or on GitHub
- Invoke SwytchCode by typing
@swytchcodein the chat - Start with the
helpcommand to see available options
For example, on GitHub:
- From your GitHub dashboard, open the Copilot chat
- In the chat screen, type
@swytchcode - Try commands like
helpto see SwytchCode in action
The agent can be used for all the same functions as the VS Code extension, including generating code for API integrations and workflows.

The SwytchCode Model Context Protocol (MCP) Server
For users who prefer to access SwytchCode through Claude Desktop or other MCP-based clients, we offer a Model Context Protocol server solution. This allows you to leverage SwytchCode’s capabilities directly within Claude’s interface.
We also provide a self-hosted, open-source version of our MCP server available on GitHub: Swytchcode MCP Server.
The MCP server runs locally on your machine and acts as a bridge between Claude Desktop and SwytchCode’s API. Here’s how to set it up:
Requirements
Before you begin, make sure you have:
- Node.js installed on your machine
- A SwytchCode account for API key access
- A copy of the SwytchCode-MCP-Server repository
Setting Up Your API Key
- Open the
api_key.shfile in your SwytchCode-MCP-Server directory - Replace the placeholder values with your SwytchCode credentials:
EMAIL="YOUR_USERNAME" PASSWORD="YOUR_PASSWORD" - Make the script executable and run it:
chmod +x api_key.sh ./api_key.sh - Once you have your key, update the
index.tsfile:const SWYTCHCODE_API_KEY = "YOUR_KEY"
Installation
The installation process is straightforward:
cd swytchcode-mcp-server
npm install
npm run build
Configuring Claude Desktop
For Mac and Linux users:
- Open the Claude Desktop configuration file:
code ~/Library/Application\ Support/Claude/claude_desktop_config.json - Add the SwytchCode MCP server configuration:
{
    "mcpServers": {
        "swytchcode": {
            "command": "node",
            "args": [
                "/ABSOLUTE/PATH/TO/PARENT/FOLDER/swytchcode-mcp-server/build/index.js"
            ]
        }
    }
}
For Windows users:
- Open the Claude Desktop configuration file:
code $env:AppData\Claude\claude_desktop_config.json - Add the SwytchCode MCP server configuration:
{
    "mcpServers": {
        "swytchcode": {
            "command": "node",
            "args": [
                "C:\\PATH\\TO\\PARENT\\FOLDER\\swytchcode-mcp-server\\build\\index.js"
            ]
        }
    }
}
Using SwytchCode in Claude Desktop
After properly configuring the MCP server, restart Claude Desktop to see two new tools:
swytchcode-generate-codeswytchcode-list-options
You can test your setup by running a simple command like:
list workflows stripe:v3 *
If you see results returned, your MCP server is correctly configured and working with Claude Desktop.
Why should you move to swytchcode?
We offer solutions for developers who regularly work with APIs and are looking to optimize their workflow. Based on the documentation and available features, here are some scenarios where SwytchCode may be beneficial:
✅ Time efficiency for API integrations: Generate code for API integrations without the need to read through comprehensive documentation.
✅ Multi-API environment: Access to a variety of APIs across payment processing, banking, cryptocurrency, e-commerce, and more from a single platform.
✅ Code standardization: Obtain consistent code that follows established patterns for each API and programming language.
✅ Workflow capabilities: Create reusable sequences of API calls that can be shared across your team.
✅ Cost savings: Significantly lower costs compared to using general-purpose LLMs or building complex agentic frameworks for API integrations.
Conclusion
API integrations shouldn’t be the bottleneck in your development process. With SwytchCode, you can skip the documentation deep-dive and get straight to working code in your preferred programming language.
Whether you’re building a new application that needs to connect with multiple services, or you’re maintaining legacy code that requires new API integrations, SwytchCode can save you countless hours of development time.